Our Blog

Keep Checking Back for Regularly Updated Content!

Ice Dams, 3 Solutions for The Silent Roof Killer

If you’ve lived in Central Indiana for long, you’ve seen ice dams: thick ridges of ice clinging to the edge of roofs, often decorated with long, sharp icicles. They might look picturesque, like a scene from a holiday card, but to a home inspector, they look like a disaster waiting to happen.

We call them ice dams, and they are one of the most destructive winter forces your home faces. As we head into the depths of an Indianapolis winter, understanding what causes them—and how to prevent them—can save you thousands of dollars in repairs.

What Exactly is an Ice Dam? 

An ice dam forms when snow on the upper part of your roof melts, runs down the slope, and then refreezes at the eaves (the overhanging edge of the roof). This creates a ridge of ice that blocks melting water from draining into your gutters. 

How Ice Dams form on your roof and gutters

Trapped with nowhere to go, that water backs up under your shingles. Eventually, it seeps into the roof decking, through the insulation, and into your ceilings and walls. This is especially true if there is an inadequate ice and water underlayment installed. By the time you see a wet stain on your drywall, the damage is already done.

Ice Dam Root Cause: It’s Not Just the Weather

Many homeowners blame the snow, but the real culprit is usually inside your attic.

Ice dams are caused by a “hot roof.” You do not want a hot roof. You want your attic and the roof above it to be as close to the outside air temperature as possible during winter months. If your attic lacks proper insulation or ventilation, warm air from your living space escapes upwards. This warms the roof deck, melting the snow even when it’s freezing outside. When that water hits the colder eaves—which are not over heated living space—it freezes instantly.

Ice Dam Solution: Proper Insulation and Ventilation

Preventing ice dams isn’t about hacking away at the ice with a shovel (which can damage your roof!). It’s about keeping your roof cold.

  1. Seal Air Leaks: Gaps around light fixtures, bathroom vents, chimneys, and attic hatches let warm air leak into the attic.

  2. Upgrade Insulation: In our climate zone, you want a thick blanket of insulation to keep heat in your living rooms, not your attic.

  3. Ensure Proper Ventilation: Soffit vents and ridge vents allow cold outdoor air to circulate through the attic, flushing out any heat that does escape.

Getting a New Roof? 

Be sure your roofer does not skimp on the Ice and Water shield at the lower edge of your roof. This water-proof barrier should cover the eaves and extend at least 24 inches past the exterior wall of your house. 

Proper ice and water shield installation involves applying the self-adhered membrane over the eave drip edge, then continuing 24-36 inches inside the heated wall line, and extending it into valleys, around penetrations (vents, chimneys), and up roof-to-wall transitions. Ensure full deck coverage with courses overlapping by 3-6 inches. This is secured it with just enough fasteners (driven straight and flush) for hold-down before shingling begins.

How much attic insulation is recommended for Central Indiana?

For Indianapolis (Indiana Climate Zone 5), aim for R-49 to R-60 attic insulation for maximum efficiency, and to prevent ice dams. This translates to about 15 to 20 inches of fiberglass/cellulose. Although R-38 (12 to14 inches) meets code, this may not be enough. Besides, the price of adding proper insulation to a thermally deficient attic will often pay for itself in a year or two by lowering heating and air conditioning costs.

How an Inspection Helps

You don’t have to guess if your home is vulnerable. A professional home inspection includes a thorough evaluation of your attic’s insulation levels and ventilation systems. Using thermal imaging technology, I can often see temperature differences that indicate missing insulation or hidden air leaks that the naked eye would miss.

Don’t wait for water to start dripping on your dining room table. If you’re concerned about your roof’s performance this winter, contact Indy Home Inspection today to schedule a check-up.

Prepare Your Indy Home for Fall: A Home Inspector’s Checklist

As we enjoy the last warm (or unbearably hot) days of an Indiana summer, it’s easy to forget that autumn is just around the corner. Those beautiful changing leaves will soon bring cooler temperatures, more rainfall, and eventually, the harsh Midwestern winter. As a professional home inspector, I see firsthand how a little preventative maintenance now can save homeowners thousands of dollars and major headaches later.

Think of this as more than just a chore list; it’s a strategic plan to protect your biggest investment. Before you settle in with pumpkin spice and Colts football, take a weekend to give your home a thorough check-up. Here’s a detailed checklist of where to focus your efforts, straight from an inspector’s playbook.

1. Clean and Inspect Your Gutters & Downspouts

This is, without a doubt, the most critical task for fall prep. Your gutter system is your home’s primary defense against water damage. Once the leaves start falling, they can quickly clog the system, causing water to overflow. In an Indiana autumn, that water runs down your siding and pools around your foundation. In the winter, it creates destructive ice dams on your roof.

  • What to do: Safely get on a ladder and clear all leaves and debris from the gutters. While you’re there, check that the gutters are securely attached to the house. Run water through them with a hose to check for leaks and ensure the downspouts are clear and directing water at least 3-6 feet away from your foundation.

2. Examine the Exterior and Seal the Gaps

Water is a home’s worst enemy. Small cracks and gaps in your home’s exterior can become major entry points for moisture, drafts, and pests trying to find a warm place for the winter. A careful walk around your property is time well spent.

  • What to do: Look closely at the siding. Are there any cracked boards or gaps? Inspect the sealant around windows and doors. Is it cracked or peeling? Use a high-quality exterior caulk to seal these gaps. Check for any areas where the soil or mulch is touching your siding, as this can attract wood-destroying insects. Ensure the ground around your foundation slopes away from the house.

3. Service Your HVAC System

Your air conditioner has been working hard all summer. Before you switch it over to heating duty, it needs a little TLC. A clean and well-maintained HVAC system runs more efficiently, saves you money on energy bills, and lasts longer.

  • What to do: The easiest and most important step is to replace your furnace filter. A clogged filter restricts airflow and makes the system work harder. Next, clear any leaves, weeds, or debris from around your outdoor air conditioning unit to ensure proper airflow. Finally, consider scheduling a professional tune-up with a qualified HVAC technician. They can perform a more thorough check and cleaning before their busy season starts.

4. Give Your Roof a Quick Look

You don’t need to get on your roof to get a sense of its condition. Small roof issues can lead to big interior leaks, so a quick visual inspection now can prevent a major disaster during a fall rainstorm.

  • What to do: Using binoculars from the ground, safely scan the entire surface of your roof. Look for any shingles that are missing, cracked, or curling at the edges. Pay close attention to the flashing around the chimney, vents, and skylights. These are common failure points.

5. Test Your Home’s Safety Devices

With windows closing up for the season, it is absolutely critical to ensure your indoor safety devices are functioning correctly. These devices are your first line of defense against fire and carbon monoxide poisoning.

  • What to do: Press the “test” button on every smoke detector and carbon monoxide (CO) detector in your house. The alarm should sound immediately. If it doesn’t, replace the batteries. If it still doesn’t work, replace the entire unit. Most detectors have a lifespan of 7-10 years; check the date on the back.
  • Additionally: Press the “test” button on all your GFCI outlets (usually in kitchens, bathrooms, garages, outdoors and elsewhere). You should hear it “trip” which will stop power to it and any down-circuit outlets connected to it. Then just press the “reset” button on the same GFCI outlet to turn it back on. If nothing happens when you press “test” or if your reset button doesn’t work to restore power, you may have a faulty outlet that needs replaced by a qualified contractor. Better to know it’s unsafe than to keep using a dangerous circuit.

A little proactive effort in the late summer pays huge dividends all winter long. By taking care of these items now, you can rest easy knowing your home is safe, secure, and ready for whatever an Indiana fall and winter can throw at it.

Of course, the most comprehensive check-up for a home is a full, professional inspection. Whether you’re buying, selling, or just want a detailed assessment of your current property, contact Indy Home Inspection today. We’ll give you the complete picture and the peace of mind you deserve.

Beyond Curb Appeal: What a Home Inspection Truly Covers

So, you’ve found a house in the Indianapolis area that feels like the one. You love the neighborhood, the layout is perfect, and you can already picture your furniture in the living room. Your real estate agent says it’s time for the home inspection. But what does that actually mean?

If you’re a first-time homebuyer, the inspection can feel like a mysterious and nerve-wracking final exam for your dream home. But it doesn’t have to be.

At its core, a home inspection is simply a professional, non-invasive, visual examination of the home’s condition on the day of the inspection. Think of it as a comprehensive physical for the house. My job as your inspector is not to “pass” or “fail” the property. I don’t tell you to buy or not buy a house. I merely provide you with the detailed information you need to make a confident and informed decision.

What We Look At (The “Big Stuff”)

During a typical inspection, I methodically assess the major systems and components of the home. This includes:

  • The Roof: I check the condition of the shingles, flashing, and gutters.
  • The Structure: This includes the foundation and framing (what I can see of it).
  • The Exterior: Siding, windows, doors, and drainage around the home.
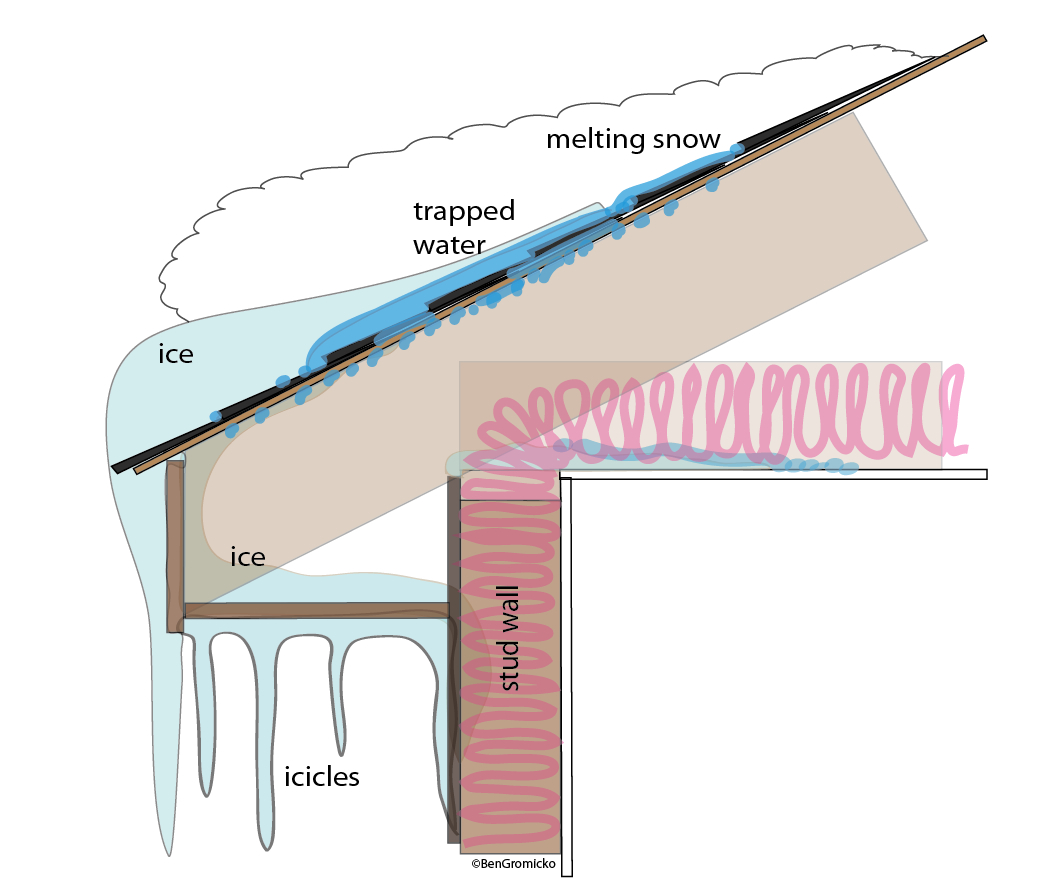
  • The Attic: Insulation, ventilation, and signs of any roof leaks.
  • The Plumbing: I test fixtures, check for leaks, and assess the water heater.
  • The Electrical System: I examine the electrical panel, test outlets (including GFCI/AFCI), and look for safety hazards.
  • The HVAC System: I operate the furnace and air conditioning (weather permitting) and check the system’s general condition.
  • The Interior: Walls, ceilings, floors, and built-in appliances.

What It’s NOT

An inspection is systematic but not technically exhaustive. We don’t perform destructive testing, meaning we won’t be opening up walls to see what’s behind them. It’s also not a code compliance inspection, although many defects we find may also be code violations. And home inspection findings do not guarantee that the items that seem to be functioning on inspection day will still be working for days, months, or years to come. However, like an annual wellness exam with your doctor, inspection reports are a key to giving you the big picture of your home’s overall health.

The Most Important Part: The Report

After the physical inspection, you’ll receive a detailed report. My philosophy at Indy Home Inspection is that a report should bring you clarity, not chaos. My reports are written in plain English, filled with high-resolution photos, and designed to help you understand the home’s condition. I’ll highlight any significant issues observed, identify potential safety concerns, and note many items that may need maintenance soon.

Sometimes I do find an issue on a major structural element of a home, weather it’s in new construction or an old historic home. My goal then is to look at the big picture and point you to resources that may provide reliable, cost-effective solutions you hadn’t considered. Your real estate agent and I both want nothing more than for you to finally acquire a safe and cozy house you will love.

The goal is to turn anxiety into knowledge. A home inspection is one of the most valuable tools you have in the buying process. It can give you confidence in your investment. It may give you and your agent a little negotiation power, and it gives you peace of mind as you take this exciting step.

That’s what a home inspection truly covers.

Have questions, or ready to schedule your inspection? Contact us today!