
Our Blog

Keep Checking Back for Regularly Updated Content!

Are Home Inspection Warranties Worth It?

If you are buying a home, a small add-on that promises extra protection can sound like an easy yes. That is why so many buyers ask, are home inspection warranties worth it? The honest answer is the same one you want from a good inspector on any other issue – sometimes yes, sometimes no, and the details matter.

A lot depends on what is actually being offered, what the home inspection already gives you, and how comfortable you are with risk after closing. Some buyers see these plans as cheap peace of mind. Others assume they are broader than they really are and end up disappointed. The goal is not to treat them as a magic shield. It is to understand where they can help and where they clearly have limits.

Are home inspection warranties worth it for most buyers?

For many buyers, they can be worth it when they come included with the inspection or when the cost is modest compared with the potential benefit. That is especially true in older homes, competitive markets, or fast-moving transactions where buyers may not have much room to negotiate repairs before closing.

But value depends on expectations. A home inspection is a visual, non-invasive evaluation of the home’s readily accessible systems and components on the day of the inspection. It is designed to identify material defects, safety concerns, and conditions that need attention. It is not a prediction that nothing will fail next month. Extra coverage can help bridge that emotional gap for buyers who worry about expensive surprises right after move-in.

That said, these plans are not all the same. Some are narrow and very specific. Some come with strict claim rules. Some cover only certain failures under certain conditions, and some exclude pre-existing issues, lack of maintenance, or items the inspector noted in the report. If you assume every future problem will be covered, you are likely to overvalue the plan.

What these plans usually cover

In most cases, home inspection warranties are meant to provide limited post-inspection or post-closing protection for certain systems or components. The most common examples include short-term mechanical and structural coverage, roof leak protection, sewer or water line assistance, and repair reimbursement tied to findings in the inspection report.

On paper, that can sound impressive. In practice, each plan has a scope, a claim window, a payout cap, and exclusions. For example, a roof leak plan may help with a new active leak that appears during the coverage period, but not with every roofing issue or a roof already at the end of its service life. A short-term systems plan may apply to a covered failure after closing, but not to a component that was already visibly damaged and documented before purchase.

This is why the real question is not just whether a plan exists. It is whether the terms line up with the risks you are most concerned about.

When the extra protection makes sense

The strongest case for buying or accepting one of these plans is when it supports an already thorough inspection rather than trying to replace one. A careful inspection gives you the facts. Extra coverage may help if something changes shortly after the inspection in a way that meets the policy terms.

First-time buyers often find real value here. If you are stretching financially to buy your first home, even a moderate repair shortly after closing can feel overwhelming. A limited protection plan may not solve every problem, but it can soften the blow of one covered issue. For many people, that peace of mind alone has value.

Older homes can also tilt the math in favor of coverage. In Indianapolis-area housing, it is common to see homes with a mix of older systems and updated finishes. A furnace may be functional today and still have age working against it. A roof may perform during the inspection and still be more vulnerable than a newer one. When a house has several aging components, a modest plan may be more attractive.

Investors sometimes see value in these plans too, especially when buying multiple properties and managing risk across a portfolio. If the plan is included at no extra cost, it can be a sensible bonus. If it costs extra, the decision becomes more analytical. Investors usually want to compare the premium, deductible, exclusions, and claim limits against the likelihood of using it.

When they are probably not worth it

They are usually not worth it when the coverage is vague, the exclusions are extensive, or the cost is high relative to the likely benefit. If a plan sounds generous in marketing language but becomes narrow in the actual terms, that is a red flag.

They also may not be worth it on newer homes with active manufacturer coverage or on properties where you already have the financial cushion to handle ordinary repairs. In that case, the extra cost may buy reassurance more than meaningful protection.

Another common problem is overlap. Buyers sometimes stack multiple plans without realizing they cover similar issues with different rules. That can create confusion instead of confidence. If you are comparing options, ask a simple question: what specific gap does this fill that is not already addressed elsewhere?

And if the inspection itself is rushed, unclear, or hard to understand, no extra protection plan fixes that core issue. The inspection report should still be your primary decision tool. It should be clear, modern, and written to educate, not alarm.

The biggest mistake buyers make

The biggest mistake is confusing a home inspection warranty with a guarantee that the home is defect-free. Homes are not static. Systems age. Weather happens. Components fail without warning. Even the best inspection cannot turn a used home into a new one.

A good inspector helps you understand the house as it exists on inspection day, with practical context about condition, maintenance, and next steps. Any added protection should be viewed as secondary support, not the main source of confidence.

That mindset matters because it changes how you evaluate value. Instead of asking, “Will this cover everything?” ask, “If one covered issue happens soon after closing, would this meaningfully help me?” That is a more realistic standard.

Questions to ask before you say yes

Before accepting or purchasing any plan, read the actual terms and ask a few direct questions. What is covered? What is excluded? How long does coverage last? Is there a deductible? Is there a cap on reimbursement? Are claims handled directly with contractors or through reimbursement after you pay first? Does the plan exclude items already noted in the inspection report?

You should also ask what documentation is required. Some plans require prompt notice, maintenance records, or specific repair procedures. Missing one step can affect a claim. A plan is only as useful as its ability to perform when you need it.

This is where working with a dependable inspection company matters. Clear communication does not stop at the report. If a service package includes added protection, it should be explained in plain language so you can judge its value without guessing.

Why the inspection still matters more than the add-on

Even when a protection plan is solid, the inspection itself remains the higher-value piece of the transaction. A quality inspection can save you money before closing by identifying safety issues, deferred maintenance, water intrusion concerns, roofing problems, electrical defects, HVAC deficiencies, plumbing leaks, and structural red flags that affect pricing and repair planning.

That information helps you negotiate, budget, prioritize, and decide whether to move forward at all. No short-term warranty can match that. The report should give you a usable roadmap, not just a pile of technical notes.

That is why the best approach is not to shop for the biggest-sounding promise. It is to start with a thorough, non-invasive inspection performed to recognized standards, then treat any included coverage as an added layer of reassurance.

A practical way to decide

If the plan is included at no extra cost, there is usually little downside as long as you understand the limits. If it costs extra, compare the price against three things: the age and condition of the home’s major systems, your emergency repair budget, and the actual terms of coverage.

If the home has several older components and your post-closing cash is tight, the value may be real. If the home is newer, the terms are narrow, and you are financially prepared for routine repairs, you may decide to skip it.

For many buyers, the smartest answer is not a hard yes or no. It is a calm, informed maybe based on the house in front of you. The right inspection should leave you with that kind of clarity – not false certainty, but a confident next step.
Top Signs of Water Intrusion at Home

A faint stain on a ceiling or a musty smell in the basement can look minor at first. In reality, those are often among the top signs of water intrusion, and the longer they sit, the more expensive and disruptive the repair usually becomes.

Water rarely announces itself with a dramatic leak. More often, it shows up slowly through subtle changes in materials, odors, or surface conditions. For buyers, sellers, and homeowners, spotting those clues early can make a major difference in repair planning, negotiation, and peace of mind.

Why water intrusion deserves quick attention

Moisture affects more than appearance. It can damage framing, insulation, drywall, trim, flooring, and even electrical components if the issue is severe enough. It can also create the conditions for microbial growth and long-term deterioration.

That said, not every stain means active leaking, and not every damp smell points to a major structural problem. A good inspection mindset is calm and methodical. The goal is to identify patterns, determine whether moisture is active or past-related, and understand what should be monitored versus what needs prompt correction.

Top signs of water intrusion inside the home

Some of the clearest warning signs appear indoors because finished surfaces react quickly to moisture. When water enters through a roof, wall, plumbing connection, window assembly, or foundation area, the materials inside the home often show the first visible clues.

Ceiling stains and wall discoloration

Brown, yellow, or copper-colored stains on ceilings and walls are classic indicators. These marks often show up below roof penetrations, around chimneys, near bathroom plumbing, under upper-floor windows, or beneath an upstairs laundry area.

The key detail is whether the stain looks active. Fresh moisture can leave darker edges, soft drywall, bubbling paint, or an area that feels cool and damp. An older stain may be dry and stable, but it still deserves attention because it points to a past moisture event that should be explained.

Peeling paint, bubbling drywall, or warped trim

Paint and drywall do not hold up well when moisture gets behind them. If you see bubbling, flaking, or swollen areas, the problem may be more than cosmetic. Trim boards, baseboards, and door casings can also expand, separate at joints, or develop a distorted shape.

This is one of the top signs of water intrusion because it often reflects repeated or ongoing exposure, not just a one-time spill. In bathrooms, kitchens, and laundry rooms, the source may be plumbing. Around exterior walls, windows and flashing details are common suspects.

Musty or damp odors

A persistent musty smell is often a moisture clue even when no stain is obvious. Basements, crawl spaces, utility rooms, and closed-up vacant homes are common places for this to show up.

Odor alone does not tell you the exact source, but it does suggest the area has been holding moisture long enough to affect materials. In Central Indiana, seasonal humidity and wet grading conditions can make lower levels especially vulnerable if drainage is poor or ventilation is limited.

Flooring changes

Buckling wood, cupped floorboards, loose vinyl, cracked tile grout, or soft spots in subflooring can all point to water exposure. Near dishwashers, refrigerators, toilets, tubs, and exterior doors, these changes are especially worth noting.

Floor damage can develop slowly, so homeowners sometimes miss it until the boards start separating or the surface feels uneven underfoot. By then, the moisture may have already affected underlayment or subfloor materials.

Exterior clues that often point to water entry

Many interior moisture issues start outside. Water intrusion is often less about one failed component and more about how roofing, siding, windows, grading, and drainage work together.

Damaged roof materials or flashing

A missing shingle is easy to notice. More often, the problem is worn flashing around roof penetrations, chimneys, skylights, or wall intersections. Water can slip into very small gaps, especially during wind-driven rain or freeze-thaw cycles.

If a home has roof stains in the attic or on upper-level ceilings, exterior roof details are one of the first areas to evaluate. Even a newer roof can leak if flashing installation was poor.

Cracked or deteriorated caulking around windows and doors

Windows and doors rely on multiple layers of protection, not just a bead of caulk. Still, failed sealant, damaged trim, and poor drainage at these openings are frequent contributors to water entry.

If you notice staining below windows, soft trim, or paint failure on nearby interior finishes, the opening itself may be allowing water to get behind the wall surface. This is especially common where maintenance has been delayed.

Gutter and downspout problems

Clogged gutters, loose sections, and downspouts that discharge too close to the foundation can send large amounts of water exactly where you do not want it. Overflowing roof runoff can affect fascia, soffits, siding, window surrounds, and foundation walls.

For many homes, exterior drainage corrections are among the most practical ways to reduce future moisture concerns. The fix may be straightforward, but the impact can be significant.

Grading that slopes toward the house

The soil around the home should direct water away from the foundation. When the grade is flat or reversed, rainwater can collect near basement or crawl space walls and increase the chance of seepage.

This does not always produce standing water indoors right away. Sometimes the first clues are efflorescence on basement walls, damp odors, or minor staining at lower wall areas.

Foundation and lower-level warning signs

Basements and crawl spaces often reveal moisture conditions that have gone unnoticed in the main living areas. These areas are less finished, so the evidence may be easier to see.

Efflorescence and damp masonry

Efflorescence is the white, chalky residue that can appear on masonry surfaces when water moves through the material and leaves mineral deposits behind. It is not mold, but it is a useful signal that moisture has been present.

Concrete and masonry can tolerate some moisture better than drywall or wood, but recurring seepage still matters. It can affect air quality, stored belongings, and adjacent building materials over time.

Wood rot or fungal growth in crawl spaces

In crawl spaces, moisture often shows up as elevated humidity, wet insulation, wood decay, or visible fungal growth on framing. Plumbing leaks, ground moisture, poor drainage, and inadequate vapor control can all contribute.

This is an area where a professional assessment is especially valuable because conditions may be hidden from daily view. A house can look fine upstairs while the crawl space tells a very different story.

When the signs are subtle, context matters

One of the biggest mistakes people make is focusing on a single symptom without looking at the full picture. A stain near a chimney means something different than bubbling paint below a second-floor bathroom. A musty basement with proper grading may suggest one set of next steps, while the same odor combined with foundation seepage suggests another.

That is why a careful, non-invasive inspection process matters. The goal is not to jump to the worst-case scenario. It is to connect visible evidence with likely causes, identify areas that need correction, and help you make decisions based on clear information.

What to do if you notice the top signs of water intrusion

Start by documenting what you see. Note the location, size, smell, and whether the issue changes after heavy rain or plumbing use. If a stain is growing, if materials feel soft, or if active dripping is present, quick action is wise.

If the source is obvious, such as an overflowing gutter or a leaking supply line, address that first. If the cause is unclear or the signs suggest hidden moisture, a professional home inspection can help narrow the problem to likely systems or building areas without adding alarm. For buyers and sellers, that kind of clarity can keep a transaction moving with fewer surprises.

In the Indianapolis area, homes deal with a mix of heavy rains, humid summers, and winter freeze-thaw conditions, which means moisture issues can come from more than one direction. A thorough inspection helps separate routine maintenance from more meaningful concerns.

Small water issues have a way of becoming larger ones when they are ignored. If something in the home looks swollen, stained, damp, or unusually musty, trust that it is worth a closer look. Clear answers early are almost always easier on your schedule, your budget, and your stress level.

Roof Inspection Warranty Coverage Explained

A roof can look fine from the driveway and still hide problems that turn expensive fast. That is why roof inspection warranty coverage gets so much attention during a home purchase. Buyers want to know whether post-inspection roof issues might be covered, sellers want fewer last-minute surprises, and homeowners want clearer expectations before the next leak tests everyone’s patience.

The tricky part is that roof-related protection is rarely as simple as people expect. Coverage depends on the inspection, the condition observed at the time, the age and type of roofing material, and the exact terms of the benefit being offered. If you understand what it is meant to do and what it is not meant to do, you can make better decisions without relying on guesswork.

What roof inspection warranty coverage usually means

When people hear this phrase, they often assume it means any future roof problem will be paid for after the inspection. That is not how these programs typically work. In most cases, the coverage is limited, conditional, and tied to specific repair scenarios that occur after an inspection has documented the roof’s visible condition.

A home inspection is non-invasive. That matters. Inspectors evaluate accessible, visible components based on recognized Standards of Practice. They are looking at roofing materials, flashing, penetrations, drainage, visible wear, and signs of active or past moisture intrusion. They are not dismantling the roof system, removing shingles, or predicting the exact remaining life of every section.

Because of that, roof inspection warranty coverage is usually best understood as added peace of mind, not a replacement for maintenance, insurance, or a roofing contractor’s installation guarantee. It can help reduce the financial sting of certain roof repairs, but it still comes with rules.

What roof inspection warranty coverage may include

The most common version is a limited roof repair benefit available after a qualifying inspection. If a covered leak or roof-related issue appears during the eligibility period, the program may reimburse some or all of the repair cost up to a stated cap.

That can be useful for buyers who are already stretching to cover down payment, closing costs, moving expenses, and immediate repairs. Even a modest repair reimbursement can change the first few months of ownership from stressful to manageable.

Some programs are tied to the inspection date and become active only if the home met certain conditions at that time. Others require timely reporting, professional repair estimates, or proof that normal maintenance was performed. This is where details matter. Two roof repair benefits can sound similar in a marketing paragraph and work very differently in practice.

For a buyer, the real value is not just the possibility of reimbursement. It is having a clearer framework for what happens if a problem shows up shortly after closing. That kind of structure helps people move forward with more confidence.

What it usually does not cover

This is the part many homeowners learn too late. Roof inspection warranty coverage usually does not apply to everything that can go wrong with a roof.

It often excludes damage caused by storms, hail, high winds, fallen limbs, or other weather events that would normally fall under a homeowners insurance claim. It may also exclude pre-existing conditions that were visible and already documented in the inspection report. If the report noted advanced shingle deterioration, active leakage, or end-of-life materials, that condition may not qualify later.

Wear and tear is another common gray area. If a roof is simply old and continues aging as expected, that is different from a newly reported covered issue. Improper installation, neglected maintenance, blocked gutters, structural movement, and problems related to skylights, chimneys, or roof-mounted equipment may also fall outside the benefit.

That is why the report matters so much. A clear modern report written to educate, not alarm, gives you the context to understand whether the roof appears serviceable, marginal, or in need of prompt specialist review.

Why the inspection itself matters more than the coverage

The protection gets attention, but the inspection is still the main event. A thorough roof inspection helps you understand current visible conditions so you can make decisions before a problem gets more expensive.

For buyers, that can mean negotiating repairs, asking for concessions, planning near-term replacement costs, or deciding the risk level is acceptable. For sellers, it can mean identifying issues early enough to address them before they disrupt a transaction. For investors, it helps with budgeting and return calculations. For homeowners, it provides a baseline for maintenance planning.

In other words, the best outcome is often not using the coverage at all. The best outcome is learning enough during the inspection to prevent surprises, budget intelligently, and act quickly where needed.

Roof inspection warranty coverage and older roofs

Older roofs deserve special attention because age changes the conversation. A roof that is near the end of its typical service life may still be performing adequately on the inspection date, but it carries a higher risk of future problems. That does not automatically mean a house is a bad purchase. It means expectations should be realistic.

This is where a calm, practical inspector adds value. Instead of using alarmist language, the report should explain the observed condition, note signs of deterioration, and recommend next steps when appropriate. Sometimes that means routine monitoring. Sometimes it means budgeting for replacement soon. Sometimes it means bringing in a roofing contractor before closing for a more specialized evaluation.

If a roof is older, roof inspection warranty coverage may be more limited or less likely to apply than a buyer assumes. That is not a flaw in the process. It is just the reality that older materials come with more uncertainty.

Questions to ask before you rely on roof inspection warranty coverage

If this benefit is part of an inspection package, ask for clarity before you need it. The right questions are simple.

Ask what events trigger coverage, what documentation is required, how long the protection lasts, and whether there is a reimbursement limit. Ask whether visible pre-existing issues are excluded and whether the roof’s age affects eligibility. Ask whether damage from storms or insurance-covered events is excluded. Also ask how a claim is started and whether repairs must be approved in advance.

These questions are not about being skeptical. They are about being informed. Good inspection companies welcome them because informed clients make steadier decisions.

How buyers in Indianapolis can use this information wisely

In the Indianapolis market, buyers often move quickly, especially when inventory is tight or a home shows well. That can create a temptation to treat roof-related protection as a safety net and move on. A better approach is to use it as one part of a broader risk picture.

Pay attention to the roof section of the report, not just the headline summary. Look at the age estimate if provided, the condition of flashing and penetrations, visible granule loss, signs of patching, sagging areas, gutter discharge patterns, and any interior signs that suggest moisture intrusion. A small ceiling stain may not mean an active leak today, but it should never be ignored.

If the report calls for further evaluation, do not read that as routine filler. It usually means the inspector saw something that deserves a closer look by a qualified roofing professional. That extra step can save you far more than any post-inspection coverage ever could.

The real benefit is confidence, not a promise of perfection

Homes are imperfect, and roofs are exposed to constant stress from weather, temperature shifts, drainage demands, and age. No inspection can guarantee a roof will never leak. No roof protection program can erase every risk. What a good inspection process can do is narrow uncertainty, document visible conditions clearly, and give you practical options.

That is what people really want during a real estate transaction. They want to know what they are looking at, what might need attention next, and where the meaningful risks are. If roof inspection warranty coverage is included, it can add useful reassurance. But its value is strongest when it sits beside a thorough inspection, responsive communication, and a report that makes the next decision easier.

Before you lean on the coverage language, lean on the inspection itself. A well-documented roof assessment gives you something better than broad promises – it gives you a clearer path forward.

How to Prioritize Inspection Repairs

The inspection report lands in your inbox, and suddenly every note feels urgent. A loose handrail, an aging water heater, a small roof concern, a GFCI issue in the kitchen – it can all blur together fast. If you are wondering how to prioritize inspection repairs, the goal is not to fix everything at once. The goal is to separate what truly affects safety, structure, and major cost from what can be planned for later.

That distinction matters whether you are buying, selling, or deciding what to tackle in a home you already own. A good inspection report is written to educate, not alarm. It gives you a clear picture of the property so you can make practical decisions with confidence.

How to prioritize inspection repairs without overreacting

The first step is to stop treating every item as equal. Inspection reports often include a mix of material defects, maintenance recommendations, safety concerns, and observations about systems nearing the end of their service life. Those categories do not carry the same weight.

A missing smoke detector is not the same as a cracked heat exchanger. A slow drain is not the same as active foundation movement. Peeling caulk around a tub matters, but not in the same way that widespread moisture intrusion in an attic matters. When people feel overwhelmed by a long report, it is usually because small maintenance items are mentally competing with big-ticket risks.

A better approach is to group findings by impact. Start with anything that could put people in danger, then move to defects that can damage the structure or major systems, then focus on repairs that affect daily function, and finally address routine maintenance and cosmetic concerns.

Start with safety hazards first

Safety issues deserve immediate attention because they can create direct risk to occupants. These are the items that should rise to the top of the list regardless of whether the home is old, new, move-in ready, or an investment property.

Examples often include electrical hazards such as exposed wiring, double-tapped breakers where improper conditions exist, missing GFCI protection in required areas, or overheated components. It can also include unsafe stairs, missing handrails, loose guardrails, gas leaks, combustion concerns, or the absence of working smoke and carbon monoxide alarms.

Not every safety item carries the same urgency, so context matters. A missing cover plate on an outlet is a simpler fix than evidence of unsafe wiring in the main panel. Both should be corrected, but one may be a same-day repair while the other may require fast evaluation by a licensed electrician.

For buyers, these are often the items worth addressing before closing or budgeting for right away after possession. For sellers, fixing straightforward safety concerns before listing can reduce buyer hesitation and keep negotiations focused.

Next, protect the house from bigger damage

After safety, focus on problems that can worsen quickly or lead to expensive secondary damage. This is where water, structure, and building envelope issues usually rise to the top.

Roof leaks, active plumbing leaks, poor drainage toward the foundation, signs of ongoing moisture intrusion, damaged flashing, and crawlspace water entry are common examples. Left alone, these issues rarely stay small. Water has a way of turning a moderate repair into drywall damage, wood rot, mold-like conditions, insulation deterioration, and framing concerns.

Structural issues also belong in this category, but this is where homeowners need some calm perspective. Not every crack means structural failure. Homes settle. Masonry cracks can be cosmetic or common for the age of the property. What matters is pattern, size, movement, and whether the defect affects function or suggests ongoing instability. An inspection can identify red flags, but the level of concern depends on what is actually observed.

If a finding points to possible structural movement or active water intrusion, that should move ahead of convenience items like a sticking interior door or a worn appliance finish. The reason is simple – larger house-level issues tend to get more expensive the longer they are ignored.

Then focus on major systems and function

Once safety and damage prevention are addressed, turn to the systems that keep the house livable. Heating and cooling, plumbing supply and drain systems, electrical distribution, and water heating all belong here.

A furnace that is not operating properly in January in Indianapolis is not just an inconvenience. It affects habitability and can create additional concerns depending on weather conditions. A failing water heater, a non-functional sump pump, or a plumbing defect that limits normal use should also rank high because these issues affect daily living and can escalate into more costly problems.

This is also the category where age and remaining service life become important. A system does not have to be broken today to deserve planning. If the air conditioner is functioning but near the end of its expected life, that may not be a repair request in a transaction, but it absolutely belongs in the budget conversation. Prioritizing does not only mean deciding what to fix now. It also means deciding what to prepare for next.

For investors, this category often gets evaluated through return and tenant impact. A cosmetic wall repair can wait. An unreliable HVAC system in a rental usually cannot.

Separate defects from maintenance and upgrades

One of the most helpful parts of learning how to prioritize inspection repairs is recognizing that some report items are ownership tasks, not urgent defects. Homes need maintenance. Caulk dries out. Filters need replacement. Grading may need improvement over time. Weatherstripping wears down. Exterior paint needs touch-up. These items matter, but they usually belong on a planned maintenance schedule rather than an emergency list.

Upgrades should be treated separately too. Older homes often have components that are functional but not modern by current standards. That does not always mean they are defective. A buyer may choose to improve insulation, replace older windows, or update fixtures for efficiency or appearance, but those are different decisions from addressing active hazards or material defects.

Keeping these categories separate helps people make better choices. It also keeps negotiations more realistic. Trying to treat every maintenance note as a major issue usually creates friction without improving the outcome.

Use cost, urgency, and consequences together

Prioritizing repairs is not just about what sounds serious. It is about weighing three practical questions. How urgent is it? What happens if it waits? How expensive does it become later?

Some low-cost repairs should happen immediately because the consequence of delay is high. A missing GFCI, a loose toilet causing leakage at the floor, or an active roof leak can fit that description. On the other hand, some expensive items can be planned if they are still functioning and not causing damage. An older but operating furnace may deserve budgeting and monitoring rather than panic.

This is where homeowners sometimes get tripped up. A small repair with high consequences can outrank a larger repair with low short-term risk. Cost alone should not decide the order.

How to prioritize inspection repairs during a real estate transaction

During a purchase, the smartest repair strategy is usually narrower than people expect. Focus first on safety concerns, material defects, active leaks or moisture intrusion, structural red flags, and major systems that are not functioning as intended. Those are the findings most likely to affect your risk after closing.

For sellers, pre-listing attention should go to the same areas. Addressing obvious hazards and functional issues ahead of time can make the report cleaner and the transaction smoother. It also signals that the home has been cared for, which builds trust.

For buyers, there is always a trade-off between asking for every repair and protecting the deal. A long request list filled with minor maintenance items can distract from the issues that really matter. A shorter, more focused request is often more effective because it centers the conversation on legitimate risk.

This is especially true in competitive markets. You still need to protect yourself, but clear priorities lead to better decisions than emotional reactions to a lengthy report.

Let the report guide you, but ask for context

A thorough inspection report gives you the findings. The next step is understanding which ones deserve immediate action, which ones need specialist review, and which ones belong in your longer-term plan. That clarity is where a calm, service-oriented inspection process adds real value.

If a report is clear and modern, you should be able to identify the serious concerns without guessing. If you are unsure, ask questions. A dependable inspector should help you understand the practical significance of a finding, not just list defects and leave you to sort it out alone.

For many clients, that conversation is what turns a stressful report into a workable plan. It is also what creates real peace of mind. You do not need to fix everything this week. You need to know what protects people, what protects the house, and what can be scheduled responsibly over time.

When you look at an inspection report through that lens, the next step becomes much clearer – handle the risks first, plan the rest thoughtfully, and make decisions from a place of confidence instead of pressure.

Ice Dams, 3 Solutions for The Silent Roof Killer

If you’ve lived in Central Indiana for long, you’ve seen ice dams: thick ridges of ice clinging to the edge of roofs, often decorated with long, sharp icicles. They might look picturesque, like a scene from a holiday card, but to a home inspector, they look like a disaster waiting to happen.

We call them ice dams, and they are one of the most destructive winter forces your home faces. As we head into the depths of an Indianapolis winter, understanding what causes them—and how to prevent them—can save you thousands of dollars in repairs.

What Exactly is an Ice Dam? 

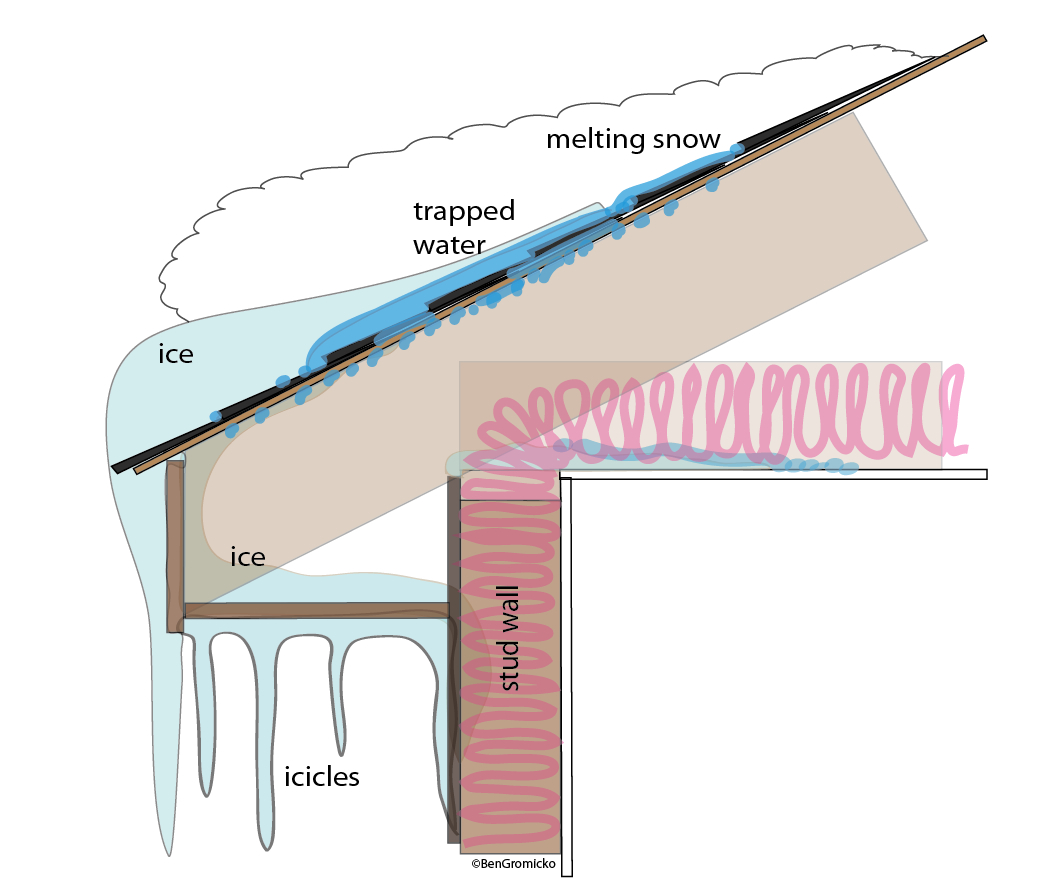
An ice dam forms when snow on the upper part of your roof melts, runs down the slope, and then refreezes at the eaves (the overhanging edge of the roof). This creates a ridge of ice that blocks melting water from draining into your gutters. 

How Ice Dams form on your roof and gutters

Trapped with nowhere to go, that water backs up under your shingles. Eventually, it seeps into the roof decking, through the insulation, and into your ceilings and walls. This is especially true if there is an inadequate ice and water underlayment installed. By the time you see a wet stain on your drywall, the damage is already done.

Ice Dam Root Cause: It’s Not Just the Weather

Many homeowners blame the snow, but the real culprit is usually inside your attic.

Ice dams are caused by a “hot roof.” You do not want a hot roof. You want your attic and the roof above it to be as close to the outside air temperature as possible during winter months. If your attic lacks proper insulation or ventilation, warm air from your living space escapes upwards. This warms the roof deck, melting the snow even when it’s freezing outside. When that water hits the colder eaves—which are not over heated living space—it freezes instantly.

Ice Dam Solution: Proper Insulation and Ventilation

Preventing ice dams isn’t about hacking away at the ice with a shovel (which can damage your roof!). It’s about keeping your roof cold.

  1. Seal Air Leaks: Gaps around light fixtures, bathroom vents, chimneys, and attic hatches let warm air leak into the attic.

  2. Upgrade Insulation: In our climate zone, you want a thick blanket of insulation to keep heat in your living rooms, not your attic.

  3. Ensure Proper Ventilation: Soffit vents and ridge vents allow cold outdoor air to circulate through the attic, flushing out any heat that does escape.

Getting a New Roof? 

Be sure your roofer does not skimp on the Ice and Water shield at the lower edge of your roof. This water-proof barrier should cover the eaves and extend at least 24 inches past the exterior wall of your house. 

Proper ice and water shield installation involves applying the self-adhered membrane over the eave drip edge, then continuing 24-36 inches inside the heated wall line, and extending it into valleys, around penetrations (vents, chimneys), and up roof-to-wall transitions. Ensure full deck coverage with courses overlapping by 3-6 inches. This is secured it with just enough fasteners (driven straight and flush) for hold-down before shingling begins.

How much attic insulation is recommended for Central Indiana?

For Indianapolis (Indiana Climate Zone 5), aim for R-49 to R-60 attic insulation for maximum efficiency, and to prevent ice dams. This translates to about 15 to 20 inches of fiberglass/cellulose. Although R-38 (12 to14 inches) meets code, this may not be enough. Besides, the price of adding proper insulation to a thermally deficient attic will often pay for itself in a year or two by lowering heating and air conditioning costs.

How an Inspection Helps

You don’t have to guess if your home is vulnerable. A professional home inspection includes a thorough evaluation of your attic’s insulation levels and ventilation systems. Using thermal imaging technology, I can often see temperature differences that indicate missing insulation or hidden air leaks that the naked eye would miss.

Don’t wait for water to start dripping on your dining room table. If you’re concerned about your roof’s performance this winter, contact Indy Home Inspection today to schedule a check-up.